插件体系概览
企业级AI应用在规模化落地过程中常面临功能扩展受限、多系统集成复杂、定制化需求响应滞后等痛点。Dify插件体系通过模块化扩展机制,将外部能力与主系统解耦,实现工作流自动化与跨平台集成,成为解决上述问题的核心方案。
插件类型与核心能力
Dify插件体系围绕三大核心能力构建,对应Tool(工具)、Model(模型)、Extension(扩展) 三种类型:
• Tool插件:作为工具提供者,支持执行特定任务如信息检索、图像生成等,可包含Endpoint接口定义,实现输入输出参数的标准化流转[1][2]。 • Model插件:专注于扩展模型能力,分为预定义模型(如OpenAI、Anthropic等商业模型)和自定义模型(支持私有训练模型集成)[3]。 • Extension插件:作为轻量级HTTP服务扩展,适用于仅需独立服务的场景(如简单数据转换、通知推送),支持Python 3.12运行时环境[4]。
插件扩展限制:不可同时扩展tools和models,不可无扩展内容,不可同时扩展models和endpoints;每种扩展类型最多支持一个供应商[1][5]。
技术架构与交互流程
Dify插件体系采用分层架构设计,通过接入层、处理层、数据层的协同实现与主系统的高效交互:
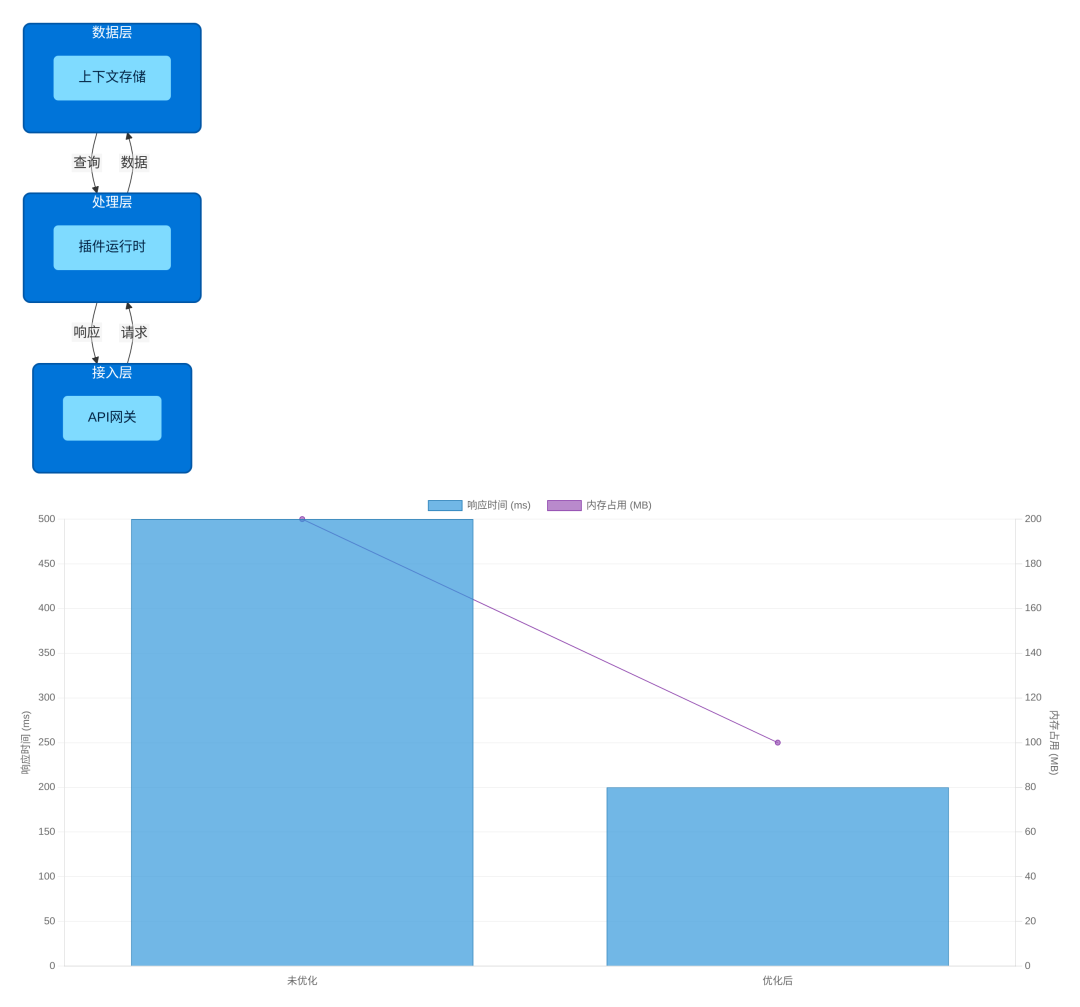
• 接入层(API网关):作为插件与主系统的通信入口,负责请求路由、权限校验与协议转换。 • 处理层(插件运行时):基于Python 3.12等环境提供沙箱执行环境,解析插件配置并调度功能模块。 • 数据层(上下文存储):负责插件执行过程中的状态管理与数据持久化,支持工作流节点间的上下文传递。
官方与第三方插件对比
| 对比维度 | 官方插件 | 第三方插件 |
|---|---|---|
| 开发权限 | ||
| 审核流程 | ||
| 维护责任 | ||
| 典型案例 |
开发标准与接口规范详解
Dify插件开发需遵循标准化的技术规范与流程约束,涵盖开发环境配置、核心接口协议、生命周期管理及错误处理体系四大维度。
开发环境配置
插件开发需基于Python 3.12及以上版本,并依赖专用脚手架工具:
分平台安装脚本
• Windows: choco install python --version=3.12.0
pip install dify-plugin-cli• macOS: brew install python@3.12
pip3 install dify-plugin-cli• Linux: sudo apt update && sudo apt install python3.12 python3-pip -y
pip3 install dify-plugin-cli
脚手架初始化流程
dify plugin init --type extension --name wechat-dingtalk-connector --author ""
核心接口协议
Manifest配置规范
manifest.yaml作为插件的"身份证",定义了插件的基本信息、权限声明与功能描述:
name: "weather-forecast"
author: "Dify Team"
description: "提供实时天气查询服务"
version: "1.0.0"
permission:
  tools: true
  llms: false
  apps: read
  storage: 10MB
  endpoints: ["GET", "POST"]
Endpoint接口定义
插件功能通过HTTP端点暴露给主平台:
- path: "/weather"
  method: "GET"
  description: "查询指定城市天气"
  parameters:
    - name: "city"
      type: "string"
      required: true
      description: "城市名称"
  extra:
    python:
      source: "endpoints/weather.py"
      function: "get_weather"
参数校验实现
使用Python pydantic库实现JSON Schema校验:
from pydantic import BaseModel, field_validator

class WeatherRequest(BaseModel):
    city: str
    date: str = None

    @field_validator('city')
    def city_must_not_be_empty(cls, v):
        if not v.strip():
            raise ValueError('城市名称不能为空')
        return v.title()
生命周期管理
插件从安装到卸载的完整生命周期包含安装→激活→运行→停用→卸载五个阶段,其中激活阶段需完成三项核心校验:配置完整性、权限一致性、依赖可用性。

错误处理体系
采用三位数字编码体系:
• 1xx:配置错误(101:缺失必填配置项,102:配置值格式错误) • 2xx:运行时错误(201:第三方API调用失败,202:数据解析错误) • 3xx:系统错误(301:内存溢出,302:文件IO异常)
日志管理实现:
import logging
from logging.handlers import RotatingFileHandler

def create_logger():
    logger = logging.getLogger("dify-plugin")
    logger.setLevel(logging.INFO)
    handler = RotatingFileHandler(
        "plugin.log", maxBytes=10*1024*1024, backupCount=5, encoding="utf-8"
    )
    formatter = logging.Formatter("%(asctime)s - %(name)s - %(levelname)s - %(message)s")
    handler.setFormatter(formatter)
    logger.addHandler(handler)
    return logger
即时通讯插件开发实战(微信/钉钉)
前置准备:平台接入配置
在企业微信管理后台创建自定义应用,记录AgentId,配置"API接收消息"的回调URL与Token/EncodingAESKey。
钉钉开放平台创建企业内部应用,获取AppKey与AppSecret,申请企业消息通知与用户信息获取接口权限。
技术方案设计:消息接收机制选型
| 评估维度 | Webhook机制 | 长轮询机制 |
|---|---|---|
| 实时性 | ||
| 并发处理能力 | ||
| 资源占用 | ||
| 部署要求 |
分阶段开发实现
阶段1:插件框架初始化
dify plugin init --type extension --name wechat-dingtalk-connector --author ""
阶段2:API客户端封装
import requests
from cachetools import TTLCache

class WeChatAPIClient:
    def __init__(self, corp_id: str, agent_id: int, app_secret: str):
        self.corp_id = corp_id
        self.agent_id = agent_id
        self.app_secret = app_secret
        self.token_cache = TTLCache(maxsize=1, ttl=7100)

    def get_access_token(self) -> str:
        if "token" in self.token_cache:
            return self.token_cache["token"]
        url = f"https://qyapi.weixin.qq.com/cgi-bin/gettoken?corpid={self.corp_id}&corpsecret={self.app_secret}"
        response = requests.get(url)
        result = response.json()
        if result.get("errcode") != 0:
            raise RuntimeError(f"获取access_token失败: {result.get('errmsg')}")
        self.token_cache["token"] = result["access_token"]
        return result["access_token"]
阶段3:消息转发核心逻辑
def handle_wechat_message(request: Request) -> Response:
    # 1. 消息签名验证
    msg_signature = request.args.get("msg_signature")
    timestamp = request.args.get("timestamp")
    nonce = request.args.get("nonce")
    if not verify_signature(msg_signature, token, timestamp, nonce, request.data):
        return Response("签名验证失败", status=403)

    # 2. 解密消息内容
    encrypted_msg = xmltodict.parse(request.data)["xml"]["Encrypt"]
    decrypted_msg = decrypt_message(encrypted_msg, encoding_aes_key)
    msg_content = xmltodict.parse(decrypted_msg)["xml"]

    # 3. 格式转换为Dify工作流输入
    dify_input = {
        "user_id": msg_content["FromUserName"],
        "message_type": "text" if msg_content["MsgType"] == "text" else "unknown",
        "content": msg_content["Content"],
        "platform": "wechat"
    }

    # 4. 调用Dify工作流API
    workflow_result = call_dify_workflow(
        workflow_id=current_app.config["DIFY_WORKFLOW_ID"],
        inputs=dify_input,
        user=msg_content["FromUserName"]
    )

    # 5. 返回处理结果
    return Response(
        f"""<xml>
            <ToUserName>{msg_content['FromUserName']}</ToUserName>
            <FromUserName>{msg_content['ToUserName']}</FromUserName>
            <CreateTime>{int(time.time())}</CreateTime>
            <MsgType>text</MsgType>
            <Content>{workflow_result['output']}</Content>
        </xml>""",
        content_type="application/xml"
    )
阶段4:多租户配置界面开发
const ConfigForm = () => {
  const [form] = Form.useForm();
  const [testResult, setTestResult] = useState(null);

  const handleTestConnection = async () => {
    const values = await form.validateFields();
    try {
      const response = await fetch('/api/test-connection', {
        method: 'POST',
        headers: {'Content-Type': 'application/json'},
        body: JSON.stringify(values)
      });
      const result = await response.json();
      setTestResult({success: result.success, message: result.message});
    } catch (error) {
      setTestResult({success: false, message: '连接测试失败'});
    }
  };

  return (
    <Form form={form} layout="vertical">
      <Form.Item name="platform_type" label="平台类型" rules={[{required: true}]}>
        <Select options={[{label: '企业微信', value: 'wechat'}, {label: '钉钉', value: 'dingtalk'}]} />
      </Form.Item>
      <Form.Item name="corp_id" label="企业ID" rules={[{required: true}]}>
        <Input placeholder="企业微信/钉钉开放平台获取的企业ID" />
      </Form.Item>
      <Button type="primary" onClick={handleTestConnection}>测试连接</Button>
      {testResult && <Result status={testResult.success ? 'success' : 'error'} title={testResult.message} />}
    </Form>
  );
};
阶段5:本地调试与官方测试环境验证
ngrok http 8000 # 将本地8000端口映射为公网URL
工作流中的插件数据流转技术
信息收集模式
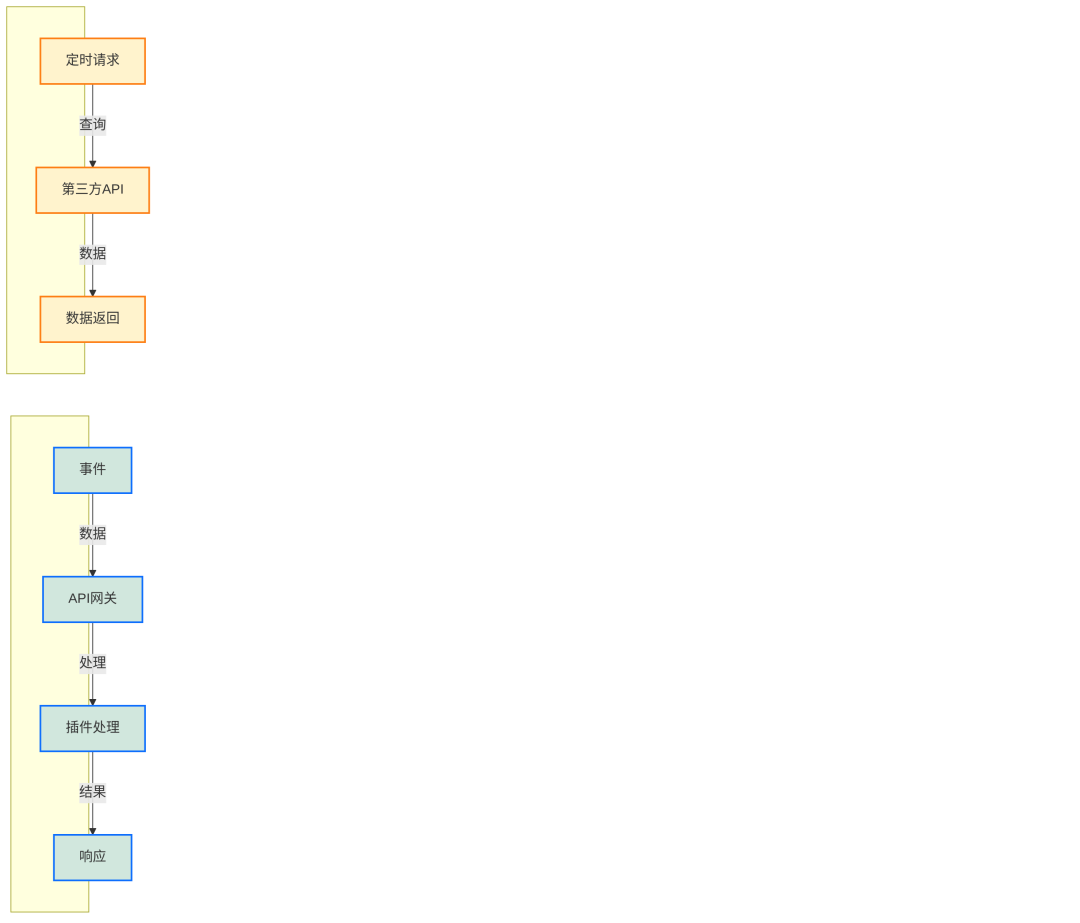
主动查询模式适用于数据源具有明确访问接口的场景,事件触发模式则适用于实时性要求高的场景。
中间步骤传参方案
Dify工作流通过上下文(Context)维护节点间的数据关联,典型结构如下:
{
  "nodes": {
    "wechat": {"output": {"message": "如何办理增值税发票认证?"}},
    "ai_model": {"output": {"response": "增值税发票认证需登录电子税务局..."}}
  },
  "variables": {"user_id": "wx123456", "ticket_type": "增值税发票"},
  "files": [{"name": "invoice.jpg", "url": "https://dify-file-storage.com/invoice.jpg"}]
}
三种核心传参方式:
直接引用:{{nodes.<node_id>.output.<field>}}
变量注入:create_json_message({"ocr_text": "apple, banana, orange"})
结果映射:通过工作流界面的"输出映射"功能可视化配置字段关联。
实战案例:典型业务场景的数据流转实现
案例1:客户咨询响应工作流
1. 微信插件接收用户消息:
{
  "output": {
    "message": "如何办理增值税发票认证?",
    "user_openid": "o6_bmjrPTlm6_2sgVt7hMZOPfL2M"
  }
}
2. AI模型插件生成回复:
{
  "output": {
    "response": "增值税发票认证流程如下:1. 登录电子税务局...",
    "confidence": 0.92
  }
}
3. 微信插件推送回复:
{
  "input": {
    "user_openid": "{{nodes.wechat.output.user_openid}}",
    "reply": "{{nodes.ai_model.output.response}}"
  }
}
高级特性与性能优化
高级特性实现
并行执行与资源调度模型
from concurrent.futures import ThreadPoolExecutor
import psutil

def get_executor(plugin_type: str) -> ThreadPoolExecutor:
    cpu_count = psutil.cpu_count()
    if plugin_type == "io_bound":  # IO密集型
        return ThreadPoolExecutor(max_workers=2 * cpu_count + 1)
    elif plugin_type == "cpu_bound":  # CPU密集型
        return ThreadPoolExecutor(max_workers=cpu_count + 1)
    return ThreadPoolExecutor(max_workers=cpu_count)
大文件传输优化
import requests
import hashlib

def upload_large_file(file_path: str, upload_url: str, chunk_size: int = 5 * 1024 * 1024):
    file_size = getsize(file_path)
    md5_hash = hashlib.md5()
    chunks = []

    with open(file_path, 'rb') as f:
        while chunk := f.read(chunk_size):
            chunks.append(chunk)
            md5_hash.update(chunk)
    total_md5 = md5_hash.hexdigest()

    for i, chunk in enumerate(chunks):
        headers = {
            "Content-Range": f"bytes {i*chunk_size}-{(i+1)*chunk_size-1}/{file_size}",
            "Chunk-Index": str(i),
            "Total-Chunks": str(len(chunks)),
            "File-MD5": total_md5
        }
        response = requests.post(upload_url, data=chunk, headers=headers)
        response.raise_for_status()

    return {"status": "success", "file_md5": total_md5}
流式数据处理
from dify_sdk import stream_variable_message

def stream_data_processor(data_source) -> None:
    for item in data_source:
        processed_item = process_single_item(item)
        yield processed_item
        stream_variable_message(
            variable="output_stream",
            value=processed_item,
            finish=False
        )
    stream_variable_message(variable="output_stream", value="", finish=True)
性能监控体系
import time
import psutil
from functools import wraps

def performance_monitor(func):
    @wraps(func)
    def wrapper(*args, **kwargs):
        start_time = time.perf_counter()
        process = psutil.Process()
        start_memory = process.memory_info().rss / 1024 / 1024

        result = func(*args, **kwargs)

        elapsed_time = (time.perf_counter() - start_time) * 1000
        end_memory = process.memory_info().rss / 1024 / 1024
        memory_used = end_memory - start_memory

        print(f"Function: {func.__name__}, Time: {elapsed_time:.2f}ms, Memory: {memory_used:.2f}MB")
        return result
    return wrapper
性能优化策略
缓存策略:第三方API结果缓存
import redis
import json

redis_client = redis.Redis(host="localhost", port=6379, db=0)

def cached_api_call(func):
    def wrapper(*args, **kwargs):
        cache_key = f"api_cache:{func.__name__}:{json.dumps(args)}:{json.dumps(kwargs)}"
        cached_result = redis_client.get(cache_key)
        if cached_result:
            return json.loads(cached_result)
        result = func(*args, **kwargs)
        redis_client.setex(cache_key, 600, json.dumps(result))
        return result
    return wrapper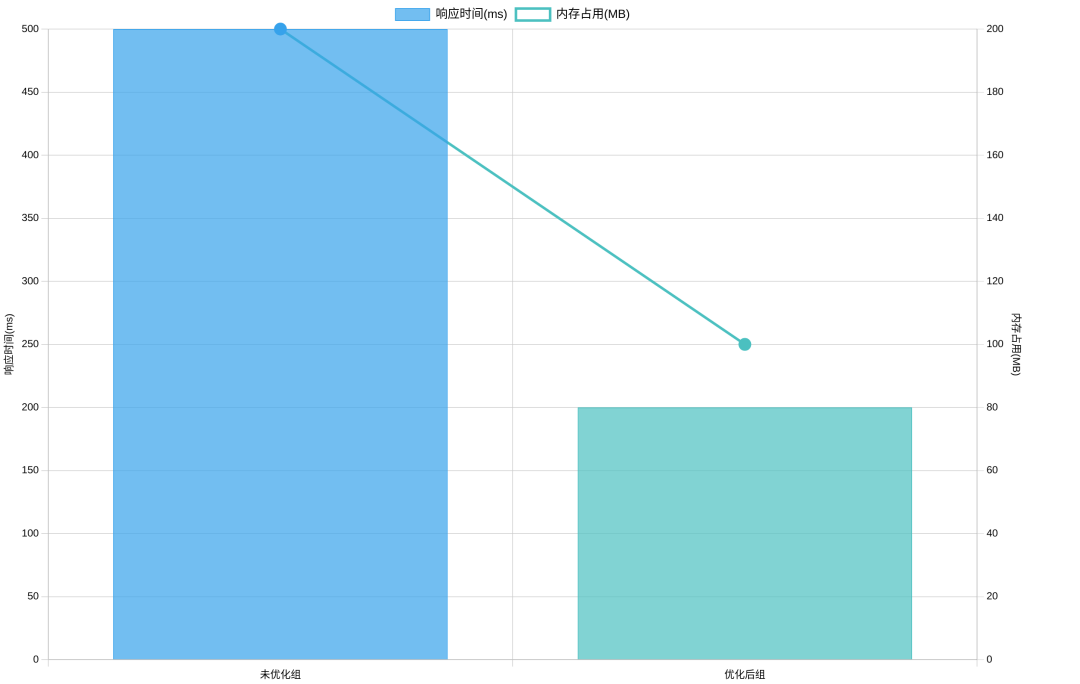
上架发布与生态共建
打包规范与版本管理
打包命令:dify plugin pack --output my-plugin.pkg
版本号管理采用语义化版本控制(Semantic Versioning):
审核标准与问题解决
常见驳回案例及解决方案:
• 输入验证缺失:使用 pydantic对所有输入参数进行类型、格式及范围验证。• 配置界面不规范:添加前端表单验证,对必填字段标记 *号并实时提示错误信息。• 功能与描述不符:开发阶段通过单元测试覆盖核心功能,交叉验证功能描述与实际效果。
文档撰写与社区贡献
GitHub README.md模板应包含:
• 功能亮点:提炼3-5个核心优势 • 快速开始:环境要求、安装命令及基础配置步骤 • API参考:输入输出参数、数据格式及错误码说明 • 常见问题:解答高频问题,附排查流程图
常见问题与解决方案
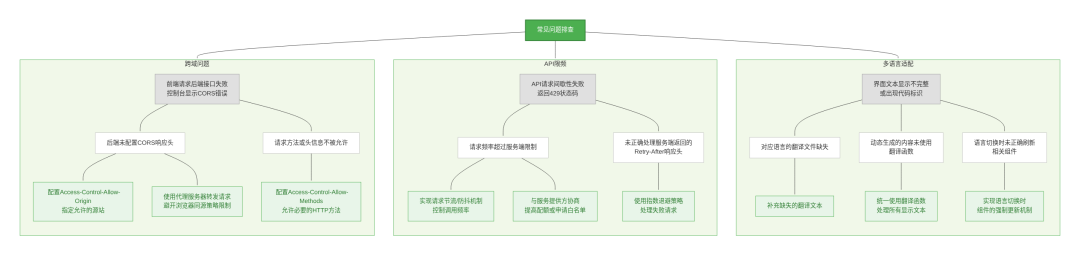
跨域请求失败
解决方案:
1. Dify平台CORS配置:登录Dify管理后台,进入「系统设置→安全配置→跨域资源共享」,添加插件服务域名。 2. Nginx反向代理配置:
server {
    listen 443 ssl;
    server_name dify.ai;

    location /plugins/weather/ {
        proxy_pass http://plugin-service:8080/;
        proxy_set_header Host $host;
        proxy_set_header X-Real-IP $remote_addr;
        proxy_set_header X-Forwarded-For $proxy_add_x_forwarded_for;
        proxy_set_header X-Forwarded-Proto $scheme;
    }
}
第三方API调用限频
解决方案:
from tenacity import retry, stop_after_attempt, wait_exponential

@retry(
    stop=stop_after_attempt(3),
    wait=wait_exponential(multiplier=1),
    retry=retry_if_exception_type((requests.exceptions.RequestException,))
)
def call_third_party_api(city: str):
    response = requests.get(
        f"https://api.weather.com/forecast?city={city}",
        headers={"Authorization": "Bearer YOUR_API_KEY"}
    )
    response.raise_for_status()
    return response.json()
多语言适配异常
解决方案:
1. manifest.yaml国际化配置:
manifest_version: 1.0
name:
  en_US: "Weather Forecast"
  zh_Hans: "天气预报"
description:
  en_US: "Get real-time weather and 7-day forecast"
  zh_Hans: "获取实时天气与7天预报"
2. Python动态语言切换:
import gettext
from flask import request

def get_translator():
    lang = request.headers.get("Accept-Language", "en_US").split(",")[0].replace("-", "_")
    try:
        return gettext.translation("plugin", localedir="locales", languages=[lang])
    except FileNotFoundError:
        return gettext.translation("plugin", localedir="locales", languages=["en_US"])