? 文章目标
本文面向 AI 应用开发者以及对模型上下文协议感兴趣的技术人员,旨在帮助大家:
理解MCP协议的核心原理:掌握客户端-服务器架构设计和通信机制的本质。 深入学习传输层实现:详细了解Stdio传输机制、JSON-RPC 2.0协议的工作原理和实际应用。 掌握关键技术实现:包括进程间通信、消息序列化、错误处理以及如何构建稳定的MCP连接。 学会实际应用开发:从理论到实践,能够独立开发和调试MCP服务器和客户端程序。
? 小提示
本文基于官方MCP文档规范编写,所有示例代码均经过实际测试验证。文末提供完整的可运行代码示例。本次文档代码可以在https://github.com/li-xiu-qi/XiaokeAILabs/tree/main/datas/test_Agent/test_mcp/mcp_theory找到更多代码示例
? 目录
? 文章目标 ? 前言 ? MCP连接流程概览 ? 连接流程说明 ?️ MCP协议核心架构详解 架构概述 ? 核心组件架构 ? Stdio传输深度解析 ? 什么是Stdio? ? Stdio的本质理解 ? Stdio的三个标准流详解 ?️ 实际代码示例 ⚡ Stdio传输的技术优势 ? MCP Stdio传输工作时序 ? 跨平台实现差异 ? 传输方式选择指南 ? JSON-RPC 2.0协议详解 ? 什么是JSON-RPC? ? JSON-RPC版本演进历史 ? JSON-RPC 1.0 vs 2.0 核心差异 ? MCP中的JSON-RPC 2.0消息格式 ❌ JSON-RPC 2.0错误代码规范 ? 批处理支持 ? 连接生命周期详解 ? 完整生命周期流程 ? 初始化阶段详细步骤 ? 消息交换模式 ? 终止处理 ⚠️ 错误处理机制 ? 标准错误代码体系 ? 错误传播机制 ?️ 实现最佳实践 ? 传输选择策略 ? 消息处理最佳实践 ? 安全考虑 ?️ 多层安全架构 ✅ 安全检查清单 ? 调试与监控 ? 关键监控指标 ? 结构化日志实现 ? 快速开始实战 ? 1. 环境准备 ? 2. 创建MCP服务器 ? 3. 创建MCP客户端 ▶️ 4. 运行测试 ? 5. 恭喜你 ? 总结与展望 ? 核心知识点回顾 ? 技术价值 ? 往期精选 ? 参考文献
? 前言
最近有很多朋友问我:MCP协议到底是什么?为什么大家都在说它很重要?
确实,Model Context Protocol (MCP) 作为Anthropic推出的开放标准,正在成为AI应用生态的重要基础设施。但很多技术文章要么过于理论化,要么缺乏实际操作指导,让初学者摸不着头脑。
本文将通过图解+代码+实战的方式,带你彻底搞懂MCP协议的核心机制。我们会从最基础的概念开始,逐步深入到技术实现细节,最后通过完整的代码示例让你能够亲手搭建一个MCP系统。
为什么要学习MCP?
标准化的AI工具连接 - 让你的AI应用能够标准化地访问各种外部工具和数据源 简化集成复杂度 - 统一的协议规范大幅降低了不同系统间的集成成本 企业级应用前景 - 各大厂商都在积极支持,是AI应用开发的未来趋势
如果你正在开发AI应用,或者想要了解现代AI系统的底层通信机制,这篇文章绝对值得仔细阅读!
觉得有收获记得给我点赞、关注,转发给需要的人,作者的创作能量就差您这关键的一份鼓励,您的支持必不可少!
好了,让我们开始这场MCP协议的探索之旅吧!
? MCP连接流程概览
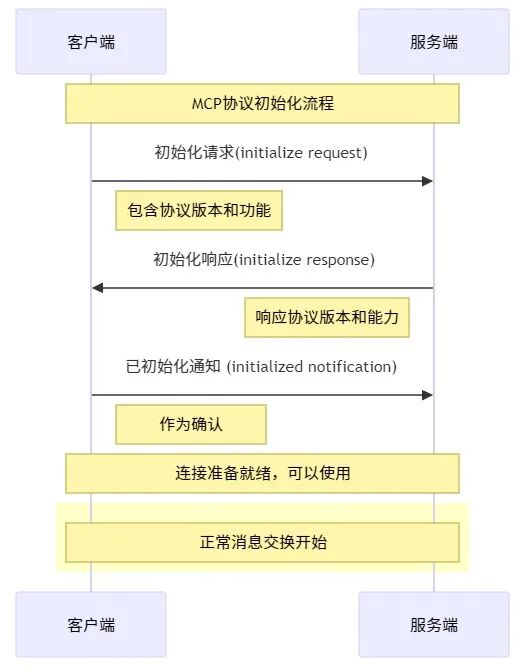
让我们先从最直观的连接时序图开始理解MCP的工作流程:
? 连接流程说明
整个MCP连接过程包含四个关键步骤:
客户端发送初始化请求 - 包含协议版本和客户端功能声明 服务器响应其协议版本和能力 - 告知客户端服务器支持的功能 客户端发送已初始化通知作为确认 - 确认初始化完成,可以开始正常通信 正常消息交换开始 - 进入业务逻辑处理阶段
这个看似简单的握手过程,实际上解决了版本兼容性、能力协商等复杂问题。就像TCP三次握手一样,确保了双方能够可靠通信。
?️ MCP协议核心架构详解
参考资料: MCP官方架构文档:地址:https://modelcontextprotocol.io/specification/2025-03-26/architecture
架构概述
Model Context Protocol (MCP) 采用经典的客户端-服务器架构设计,这种设计让大型语言模型(LLM)应用程序能够与各种集成服务进行标准化通信。
? 架构角色解析
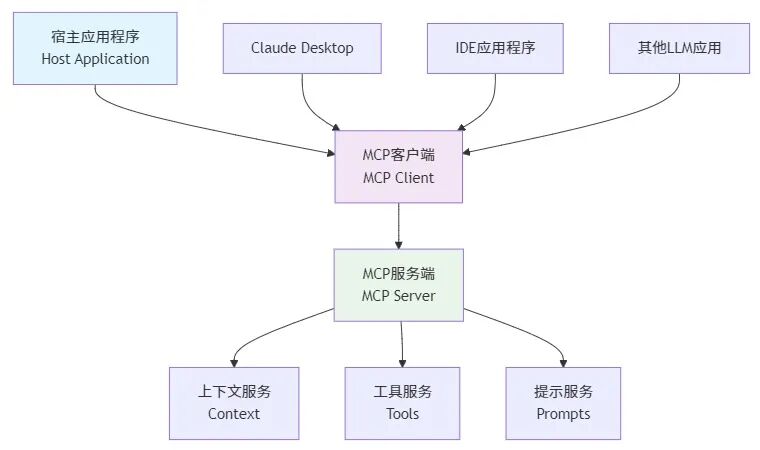
在MCP体系中,有三个核心角色:
? 宿主(Host):LLM应用程序的载体,比如Claude Desktop、VS Code等IDE,负责发起连接并管理整个交互流程 ? 客户端(Client):运行在宿主应用程序内部的组件,与服务器保持一对一连接,处理具体的通信逻辑 ? 服务器(Server):为客户端提供上下文、工具和提示服务的后端程序,是功能的实际提供者
这种分层设计的优势在于:职责清晰、可扩展性强、便于维护。
? 核心组件架构
MCP协议栈分为两个主要层次:
1. 协议层(Protocol Layer)
协议层在MCP负责:
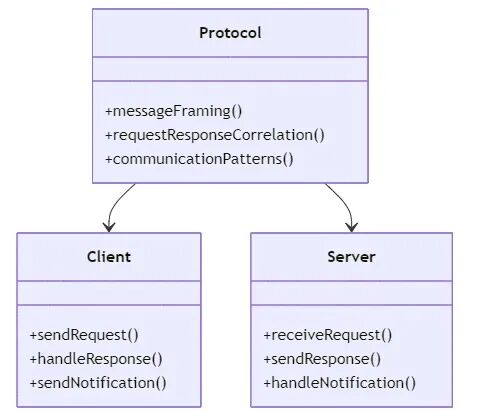
消息框架管理 - 定义消息的标准格式和结构 请求响应关联 - 确保每个请求都能找到对应的响应 高级通信模式 - 支持同步、异步、通知等多种通信方式
2. 传输层(Transport Layer)
传输层在MCP负责实际的数据传输:
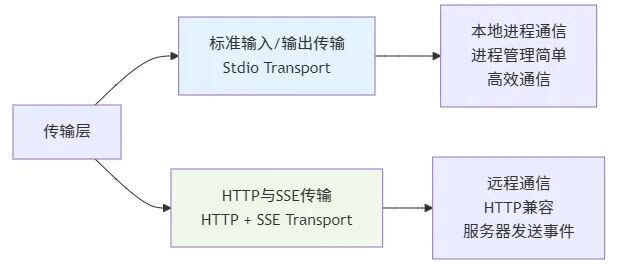
MCP支持多种传输机制,目前主要包括:
Stdio传输 - 基于标准输入输出的本地进程通信 HTTP + SSE传输 - 基于HTTP协议的网络通信
? Stdio传输深度解析
参考资料: MCP传输层官方文档,地址:https://modelcontextprotocol.io/docs/concepts/transports | Python subprocess模块文档,地址:https://docs.python.org/3/library/subprocess.html
? 什么是Stdio?
Stdio(Standard Input/Output,标准输入输出) 是操作系统提供的基础I/O机制。每个进程启动时都会自动获得三个标准文件描述符,这是程序与外界交互的基本通道。
? Stdio的本质理解
Stdio本质上就是捕获和重定向终端输入输出。 让我们通过对比来深入理解:
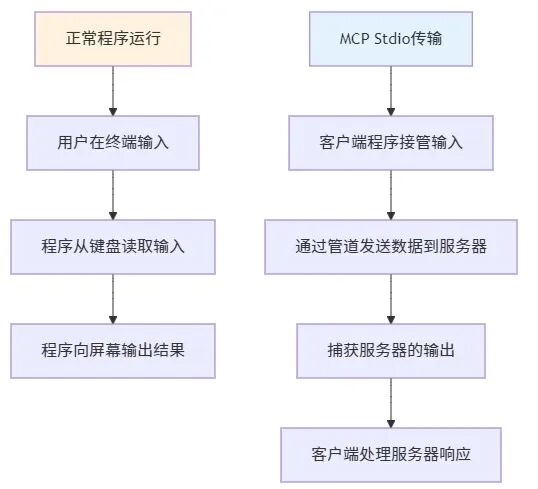
? 传统终端交互 vs MCP Stdio传输
1. 传统终端交互模式:
# 用户在终端中手动运行程序
C:\> python my_server.py
# 用户手动输入JSON消息
{"jsonrpc":"2.0","method":"test","id":1}
# 程序输出响应到屏幕
{"jsonrpc":"2.0","result":"success","id":1}
2. MCP Stdio传输模式:
# 客户端程序自动启动服务器并捕获I/O
import subprocess

# 启动服务器进程,捕获其stdin/stdout
process = subprocess.Popen(
    ['python', 'my_server.py'],
    stdin=subprocess.PIPE,    # 捕获服务器的输入
    stdout=subprocess.PIPE,   # 捕获服务器的输出
    stderr=subprocess.PIPE,   # 捕获服务器的错误输出
    text=True
)

# 客户端发送数据到服务器的stdin(模拟用户在终端输入)
process.stdin.write('{"jsonrpc":"2.0","method":"test","id":1}\n')
process.stdin.flush()

# 客户端读取服务器的stdout(捕获程序的终端输出)
response = process.stdout.readline()
print(f"服务器响应: {response}")
? Stdio的三个标准流详解
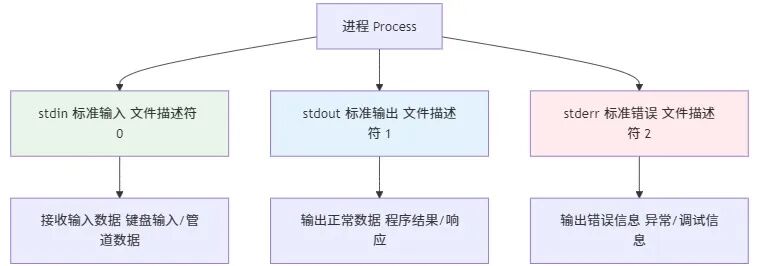
| stdin | |||
| stdout | |||
| stderr |
?️ 实际代码示例
让我们通过一个完整的例子来理解Stdio在MCP中的应用:
服务器端实现
import sys
import json

def main():
    """MCP服务器主函数"""
    whileTrue:
        try:
            # 从stdin读取客户端消息(相当于等待终端输入)
            line = sys.stdin.readline()
            ifnot line:
                break

            # 解析JSON-RPC请求
            request = json.loads(line.strip())

            # 处理请求并生成响应
            if request.get('method') == 'echo':
                response = {
                    "jsonrpc": "2.0",
                    "result": f"Echo: {request.get('params', '')}",
                    "id": request.get('id')
                }
            else:
                response = {
                    "jsonrpc": "2.0",
                    "error": {"code": -32601, "message": "Method not found"},
                    "id": request.get('id')
                }

            # 向stdout输出响应(相当于终端输出)
            print(json.dumps(response), flush=True)

        except Exception as e:
            # 错误信息发送到stderr(终端错误输出)
            print(f"Error: {e}", file=sys.stderr, flush=True)

if __name__ == "__main__":
    main()
客户端实现
import subprocess
import json

class MCPStdioClient:
    """MCP Stdio客户端封装"""

    def __init__(self):
        # 启动服务器进程,捕获其所有I/O流
        self.process = subprocess.Popen(
            ['python', 'my_mcp_server.py'],
            stdin=subprocess.PIPE,   # 我们控制服务器的输入
            stdout=subprocess.PIPE,  # 我们捕获服务器的输出
            stderr=subprocess.PIPE,  # 我们捕获服务器的错误
            text=True,
            bufsize=0# 无缓冲,实时通信
        )

    def send_request(self, method, params=None):
        """发送请求到MCP服务器"""
        # 构造JSON-RPC请求
        request = {
            "jsonrpc": "2.0",
            "method": method,
            "params": params,
            "id": 1
        }

        # 发送到服务器的stdin(模拟在终端输入)
        json_str = json.dumps(request) + '\n'
        self.process.stdin.write(json_str)
        self.process.stdin.flush()

        # 从服务器的stdout读取响应(捕获终端输出)
        response_line = self.process.stdout.readline()
        return json.loads(response_line.strip())

    def close(self):
        """关闭连接"""
        self.process.terminate()
        self.process.wait()

# 使用示例
client = MCPStdioClient()

# 发送测试请求
response = client.send_request("echo", "Hello MCP!")
print(f"服务器响应: {response}")
# 输出: 服务器响应: {"jsonrpc": "2.0", "result": "Echo: Hello MCP!", "id": 1}

client.close()
⚡ Stdio传输的技术优势
相比网络传输方式,Stdio传输有以下显著优势:
| 性能优越 | ||
| 部署简单 | ||
| 资源隔离 | ||
| 生命周期管理 |
? MCP Stdio传输工作时序
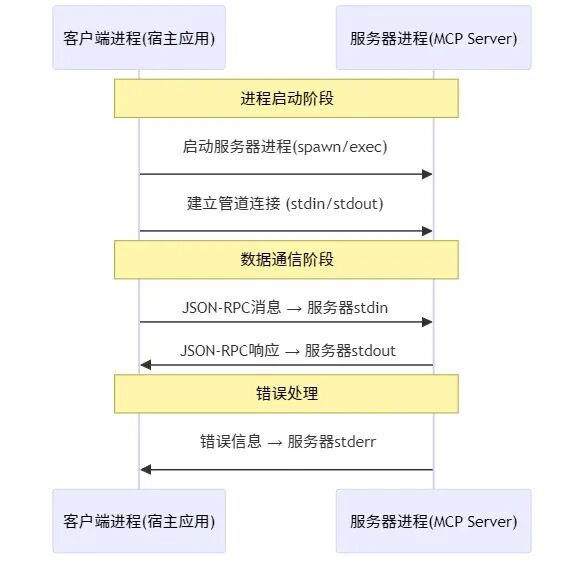
? 跨平台实现差异
| Windows | |||
| Linux/macOS |
Python的subprocess模块为我们屏蔽了这些平台差异,提供了统一的编程接口。
? 传输方式选择指南
| Stdio 传输 | 本地应用集成 | • 零网络配置 • 自动资源管理 | • 单一连接模式 |
| HTTP + SSE 传输 | 分布式系统 | • 多客户端支持 • 标准协议 | • 配置复杂 • 状态管理 |
? JSON-RPC 2.0协议详解
参考资料: JSON-RPC 2.0官方规范,地址:https://www.jsonrpc.org/specification
? 什么是JSON-RPC?
JSON-RPC 是一个基于JSON格式的远程过程调用(Remote Procedure Call, RPC)协议规范。它让客户端能够通过网络调用远程服务器上的方法,就像调用本地函数一样简单。
? JSON-RPC版本演进历史
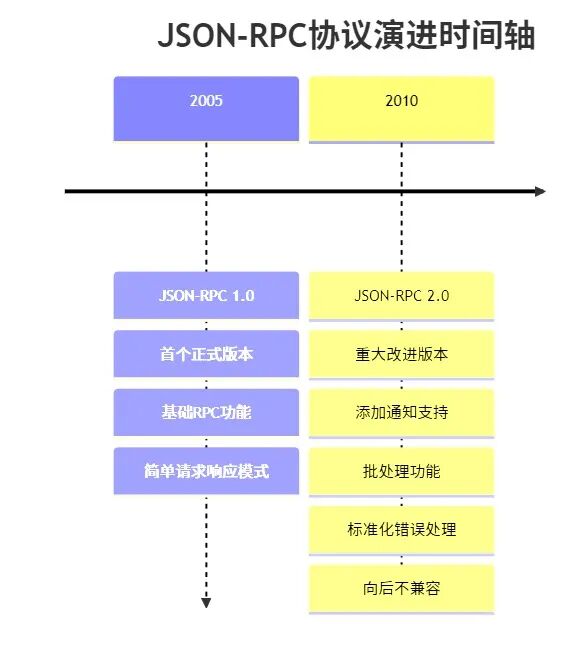
? JSON-RPC 1.0 vs 2.0 核心差异
1. 协议版本标识
// JSON-RPC 1.0 - 没有版本字段
{
"method": "echo",
"params": ["Hello"],
"id": 1
}

// JSON-RPC 2.0 - 必须包含版本字段
{
"jsonrpc": "2.0",
"method": "echo",
"params": ["Hello"],
"id": 1
}
2. 参数传递方式增强
| 参数类型 | ||
| 位置参数 | ["param1", "param2"] | ["param1", "param2"] |
| 命名参数 | {"name": "value", "age": 30} |
3. 功能特性对比表
"jsonrpc": "2.0" | |||
? MCP中的JSON-RPC 2.0消息格式
1. 请求消息格式
{
  "jsonrpc": "2.0",           // 协议版本,必须是"2.0"
  "method": "initialize",      // 要调用的方法名
  "params": {                 // 参数对象(可选)
    "protocolVersion": "2025-03-26",
    "capabilities": {...}
  },
  "id": 1                     // 请求标识符
}
2. 成功响应格式
{
  "jsonrpc": "2.0",           // 协议版本
  "result": {                 // 方法执行结果
    "protocolVersion": "2025-03-26",
    "capabilities": {...}
  },
  "id": 1                     // 与请求对应的ID
}
3. 错误响应格式
{
  "jsonrpc": "2.0",           // 协议版本
  "error": {                  // 错误对象
    "code": -32602,           // 错误代码
    "message": "Invalid params", // 错误描述
    "data": {                 // 额外错误信息(可选)
      "details": "Missing required parameter 'name'"
    }
  },
  "id": 1                     // 与请求对应的ID
}
4. 通知消息格式
{
  "jsonrpc": "2.0",           // 协议版本
  "method": "notifications/initialized", // 方法名
  "params": {...}             // 参数(可选)
  // 注意:通知消息没有id字段,因此不需要响应
}
❌ JSON-RPC 2.0错误代码规范
? 批处理支持
JSON-RPC 2.0支持批处理,可以在一次传输中发送多个请求:
// 批处理请求
[
  {"jsonrpc": "2.0", "method": "prompts/list", "id": 1},
  {"jsonrpc": "2.0", "method": "tools/list", "id": 2},
  {"jsonrpc": "2.0", "method": "resources/list", "id": 3}
]
// 批处理响应
[
  {"jsonrpc": "2.0", "result": [...], "id": 1},
  {"jsonrpc": "2.0", "result": [...], "id": 2},
  {"jsonrpc": "2.0", "result": [...], "id": 3}
]
? 连接生命周期详解
? 完整生命周期流程
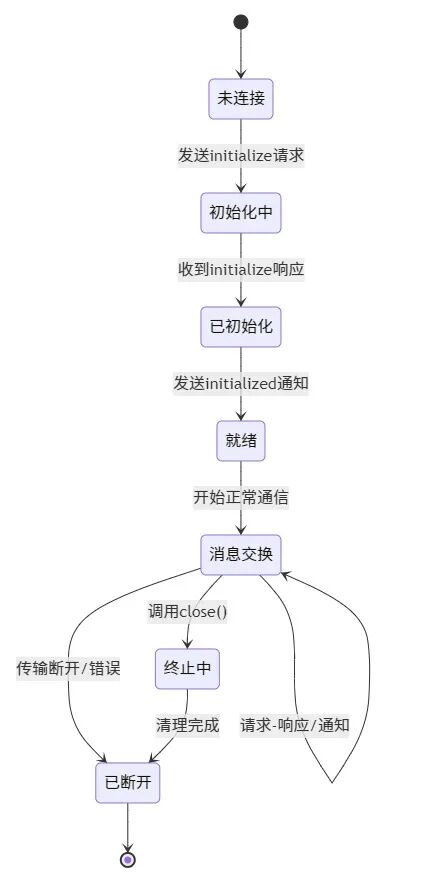
初始化阶段详细步骤
Step 1: 客户端发送初始化请求
{
  "jsonrpc": "2.0",
"id": 1,
"method": "initialize",
"params": {
    "protocolVersion": "2025-03-26",
    "capabilities": {
      "roots": {
        "listChanged": true
      },
      "sampling": {}
    },
    "clientInfo": {
      "name": "ExampleClient",
      "version": "1.0.0"
    }
  }
}
Step 2: 服务器响应初始化
{
  "jsonrpc": "2.0",
"id": 1,
"result": {
    "protocolVersion": "2025-03-26",
    "capabilities": {
      "logging": {},
      "prompts": {
        "listChanged": true
      },
      "resources": {
        "subscribe": true,
        "listChanged": true
      },
      "tools": {
        "listChanged": true
      }
    },
    "serverInfo": {
      "name": "ExampleServer",
      "version": "1.0.0"
    },
    "instructions": "Optional instructions for the client"
  }
}
Step 3: 客户端发送已初始化通知
{
  "jsonrpc": "2.0",
  "method": "notifications/initialized"
}
消息交换模式
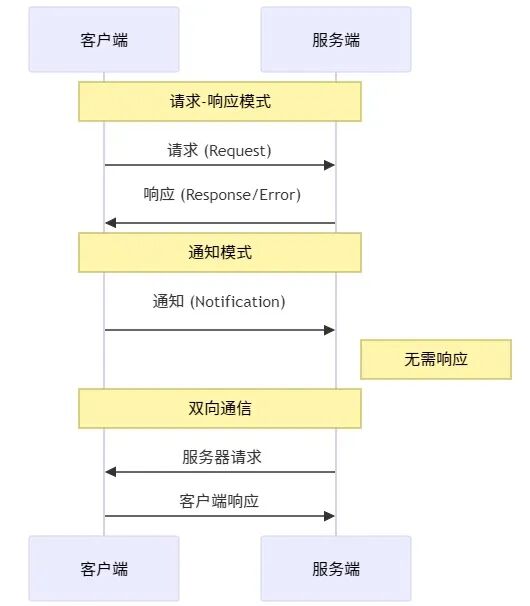
MCP支持三种主要的消息交换模式:
请求-响应模式 - 同步通信,等待响应 通知模式 - 异步通信,不需要响应 流式模式 - 持续数据流传输
终止处理
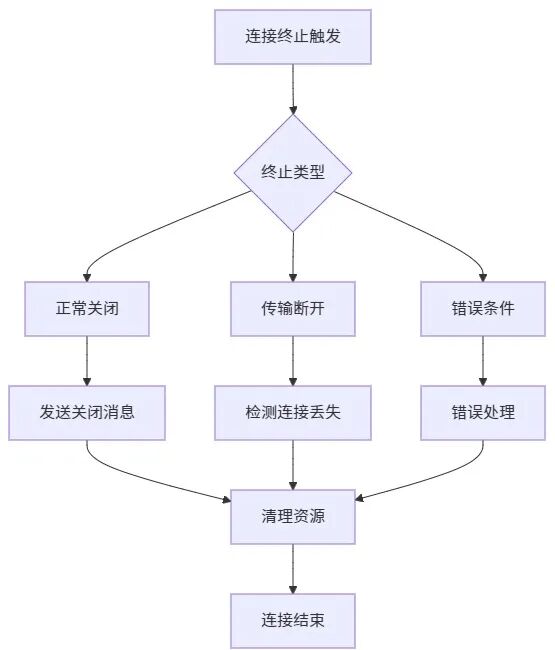
优雅的连接终止包括:
发送终止通知 等待未完成请求 清理资源 关闭连接
⚠️ 错误处理机制
参考资料: JSON-RPC 2.0错误处理规范,地址:https://www.jsonrpc.org/specification#error_object
标准错误代码体系
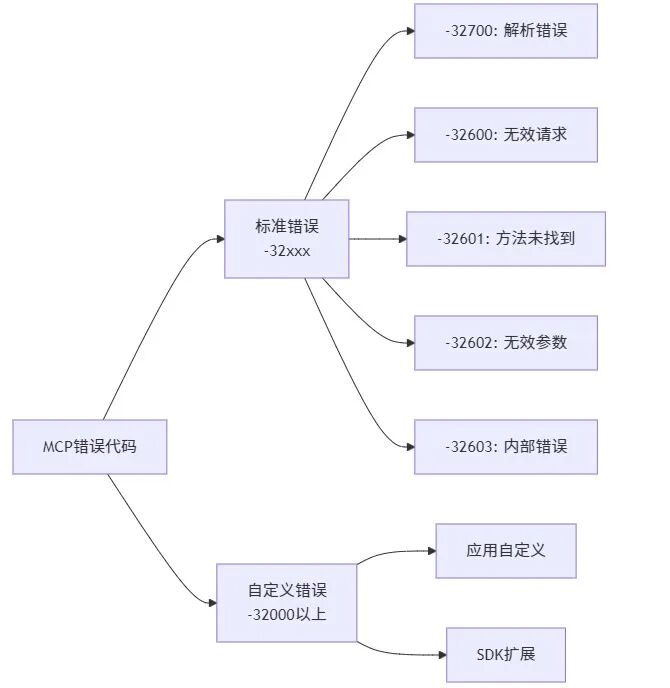
? 错误传播机制
// 错误响应示例
{
  "jsonrpc": "2.0",
  "id": 1,
  "error": {
    "code": -32602,
    "message": "Invalid params",
    "data": {
      "details": "Required parameter 'name' is missing"
    }
  }
}
?️ 实现最佳实践
? 传输选择策略
| 桌面应用集成 | ||
| Web服务集成 | ||
| 开发测试 | ||
| 生产部署 |
? 消息处理最佳实践
1. 请求处理模板
async def handle_request(request):
    """标准的MCP请求处理流程"""
    try:
        # 1. 验证输入
        validate_input(request.params)

        # 2. 类型安全处理
        result = await process_request_safely(request)

        # 3. 返回结果
        return {"result": result}

    except ValidationError as e:
        return {"error": {"code": -32602, "message": str(e)}}
    except TimeoutError:
        return {"error": {"code": -32603, "message": "Request timeout"}}
    except Exception as e:
        return {"error": {"code": -32603, "message": f"Internal error: {str(e)}"}}
2. 进度报告机制
async def long_operation(progress_token):
    """长时间操作的进度报告示例"""
    total_steps = 100
    for i in range(total_steps):
        # 执行操作
        await perform_step(i)

        # 报告进度
        if progress_token:
            await send_progress({
                "token": progress_token,
                "value": i + 1,
                "total": total_steps
            })
? 安全考虑
参考资料: MCP安全与信任指南,地址:https://modelcontextprotocol.io/specification/2025-03-26#security-and-trust--safety
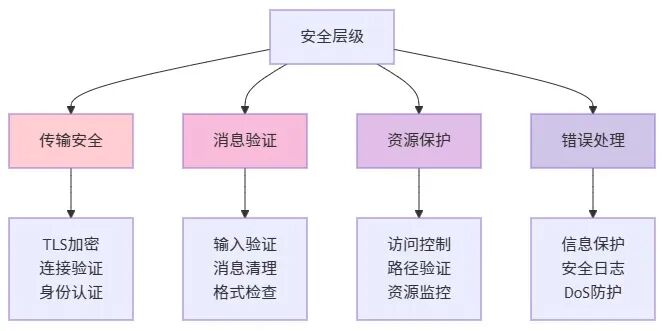
多层安全架构
✅ 安全检查清单
| 传输安全 | • 验证连接来源 • 实现适当的身份验证 | |
| 消息安全 | • 清理和转义输入 • 检查消息大小限制 | |
| 资源安全 | • 验证资源路径 • 监控资源使用 |
? 调试与监控
? 关键监控指标
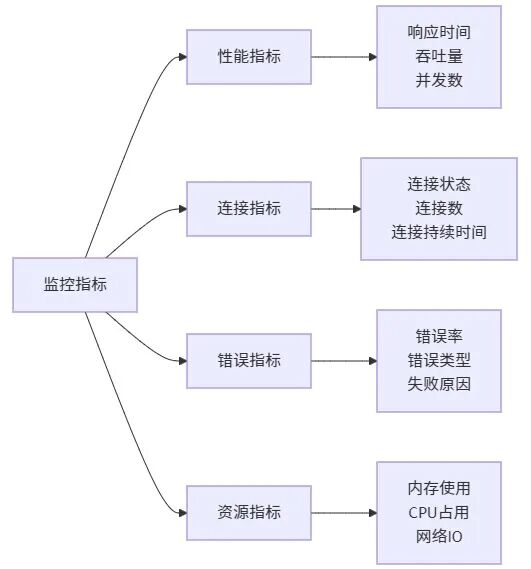
重要的监控指标包括:
连接状态 - 活跃连接数、连接成功率 消息统计 - 请求量、响应时间、错误率 资源使用 - CPU、内存、网络带宽 业务指标 - 工具调用成功率、数据传输量
? 结构化日志实现
import logging
import json
import time

class MCPLogger:
    """MCP协议专用日志记录器"""

    def __init__(self):
        self.logger = logging.getLogger('mcp')

    def log_protocol_event(self, event_type, details):
        """记录协议事件"""
        self.logger.info(json.dumps({
            "type": "protocol_event",
            "event": event_type,
            "timestamp": time.time(),
            "details": details
        }))

    def log_message_flow(self, direction, message):
        """记录消息流"""
        self.logger.debug(json.dumps({
            "type": "message_flow",
            "direction": direction,  # "incoming" or "outgoing"
            "message_id": message.get("id"),
            "method": message.get("method"),
            "timestamp": time.time()
        }))
? 快速开始实战
想要快速体验MCP协议的魅力吗?跟着下面的步骤,15分钟就能搭建一个完整的MCP系统!
1. 环境准备
# 创建项目目录
mkdir mcp-tutorial && cd mcp-tutorial

# 安装依赖(Python 3.7+)
pip install asyncio
? 2. 创建MCP服务器
创建 mcp_server.py:
import sys
import json
import asyncio

class SimpleMCPServer:
    """简单的MCP服务器实现"""

    def __init__(self):
        self.running = True
        print("? MCP服务器启动中...", file=sys.stderr)
        print("? 等待客户端连接...", file=sys.stderr)

    asyncdef handle_message(self, message):
        """处理客户端消息"""
        print(f"? 收到消息: {message}", file=sys.stderr)

        # 验证JSON-RPC格式
        ifnot isinstance(message, dict):
            return self.create_error_response(None, -32600, "Invalid Request")

        if message.get('jsonrpc') != '2.0':
            return self.create_error_response(message.get('id'), -32600, "Invalid JSON-RPC version")

        method = message.get('method')
        ifnot method:
            return self.create_error_response(message.get('id'), -32600, "Missing method")

        # 处理不同的方法
        if method == 'initialize':
            return {
                "jsonrpc": "2.0",
                "id": message['id'],
                "result": {
                    "protocolVersion": "2025-03-26",
                    "capabilities": {
                        "tools": {},
                        "resources": {},
                        "prompts": {}
                    },
                    "serverInfo": {
                        "name": "SimpleMCPServer",
                        "version": "1.0.0"
                    }
                }
            }
        elif method == 'ping':
            return {
                "jsonrpc": "2.0",
                "id": message['id'],
                "result": {"message": "pong", "timestamp": __import__('time').time()}
            }
        else:
            return self.create_error_response(message.get('id'), -32601, f"Method not found: {method}")

    def create_error_response(self, request_id, code, message):
        """创建错误响应"""
        return {
            "jsonrpc": "2.0",
            "id": request_id,
            "error": {"code": code, "message": message}
        }

    asyncdef run(self):
        """服务器主循环"""
        while self.running:
            try:
                # 从stdin读取消息
                line = await asyncio.get_event_loop().run_in_executor(
                    None, sys.stdin.readline
                )

                ifnot line:
                    print("? 客户端断开连接", file=sys.stderr)
                    break

                line = line.strip()
                ifnot line:
                    continue

                # 解析JSON消息
                try:
                    message = json.loads(line)
                except json.JSONDecodeError as e:
                    error_response = self.create_error_response(None, -32700, f"Parse error: {str(e)}")
                    print(json.dumps(error_response), flush=True)
                    continue

                # 处理消息
                response = await self.handle_message(message)

                # 发送响应
                if response:
                    response_json = json.dumps(response)
                    print(f"? 发送响应: {response_json}", file=sys.stderr)
                    print(response_json, flush=True)

            except Exception as e:
                print(f"? 服务器错误: {e}", file=sys.stderr)
                error_response = self.create_error_response(None, -32603, f"Internal error: {str(e)}")
                print(json.dumps(error_response), flush=True)

if __name__ == "__main__":
    server = SimpleMCPServer()
    asyncio.run(server.run())
3. 创建MCP客户端
创建 mcp_client.py:
import subprocess
import json
import time

class SimpleMCPClient:
    """简单的MCP客户端实现"""

    def __init__(self):
        print("? 启动MCP客户端...")
        # 启动服务器进程
        self.process = subprocess.Popen(
            ['python', 'mcp_server.py'],
            stdin=subprocess.PIPE,
            stdout=subprocess.PIPE,
            stderr=subprocess.PIPE,
            text=True
        )
        self.request_id = 0
        print("✅ 服务器进程已启动")

    def send_request(self, method, params=None):
        """发送请求到服务器"""
        self.request_id += 1
        request = {
            "jsonrpc": "2.0",
            "id": self.request_id,
            "method": method
        }
        if params:
            request["params"] = params

        # 发送请求
        request_json = json.dumps(request) + '\n'
        print(f"? 发送请求: {request}")
        self.process.stdin.write(request_json)
        self.process.stdin.flush()

        # 读取响应
        response_line = self.process.stdout.readline()
        response = json.loads(response_line.strip())
        print(f"? 收到响应: {response}")
        return response

    def close(self):
        """关闭客户端"""
        print("? 关闭连接...")
        self.process.terminate()
        self.process.wait()
        print("✅ 连接已关闭")

def main():
    """客户端测试主函数"""
    client = SimpleMCPClient()

    try:
        # 1. 发送初始化请求
        print("\n=== 步骤1: 初始化连接 ===")
        response = client.send_request("initialize", {
            "protocolVersion": "2025-03-26",
            "capabilities": {"roots": {}, "sampling": {}},
            "clientInfo": {"name": "TestClient", "version": "1.0.0"}
        })

        if"result"in response:
            print("✅ 初始化成功!")
            print(f"服务器信息: {response['result']['serverInfo']}")

        # 2. 发送ping测试
        print("\n=== 步骤2: 连接测试 ===")
        response = client.send_request("ping")

        if"result"in response:
            print("✅ Ping测试成功!")
            print(f"服务器响应: {response['result']['message']}")

        # 3. 测试错误处理
        print("\n=== 步骤3: 错误处理测试 ===")
        response = client.send_request("unknown_method")

        if"error"in response:
            print("✅ 错误处理正常!")
            print(f"错误信息: {response['error']['message']}")

    except Exception as e:
        print(f"❌ 测试失败: {e}")

    finally:
        client.close()

if __name__ == "__main__":
    main()
▶️ 4. 运行测试
# 运行客户端测试
python mcp_client.py
你应该能看到类似这样的输出:
? 启动MCP客户端...
✅ 服务器进程已启动

=== 步骤1: 初始化连接 ===
? 发送请求: {'jsonrpc': '2.0', 'id': 1, 'method': 'initialize', 'params': {...}}
? 收到响应: {'jsonrpc': '2.0', 'id': 1, 'result': {...}}
✅ 初始化成功!
服务器信息: {'name': 'SimpleMCPServer', 'version': '1.0.0'}

=== 步骤2: 连接测试 ===
? 发送请求: {'jsonrpc': '2.0', 'id': 2, 'method': 'ping'}
? 收到响应: {'jsonrpc': '2.0', 'id': 2, 'result': {'message': 'pong', 'timestamp': 1703123456.789}}
✅ Ping测试成功!
服务器响应: pong

=== 步骤3: 错误处理测试 ===
? 发送请求: {'jsonrpc': '2.0', 'id': 3, 'method': 'unknown_method'}
? 收到响应: {'jsonrpc': '2.0', 'id': 3, 'error': {'code': -32601, 'message': 'Method not found: unknown_method'}}
✅ 错误处理正常!
错误信息: Method not found: unknown_method

? 关闭连接...
✅ 连接已关闭
5. 恭喜你
如果看到上面的输出,说明你已经成功搭建了一个完整的MCP系统!你刚刚完成了:
✅ MCP服务器 - 能够处理初始化、ping请求和错误处理
✅ MCP客户端 - 能够与服务器进行标准的JSON-RPC 2.0通信
✅ Stdio传输 - 通过标准输入输出进行进程间通信
✅ 错误处理 - 标准的JSON-RPC错误代码和消息格式
总结与展望
通过本文的学习,我们深入了解了MCP协议的核心机制:
核心知识点回顾
架构理解 - 客户端-服务器模式、协议层和传输层的分离设计 传输机制 - Stdio传输的本质:进程间的标准输入输出重定向 协议规范 - JSON-RPC 2.0的消息格式、错误处理和生命周期管理 实践应用 - 从零开始构建完整的MCP系统
技术价值
MCP协议的价值在于:
标准化 - 为AI应用提供统一的工具集成接口 简化开发 - 降低不同系统间的集成复杂度 生态建设 - 促进AI工具和服务的标准化发展
MCP协议作为AI应用的基础设施,正在快速发展。掌握这些核心概念,将为你在AI应用开发领域提供强大的技术基础。